If you are weighing up a kitchen makeover, the kitchen respray timeline from start to finish is usually one of the first things you want to know. Not the sales version, but the real one – how long it takes, what happens on each day, and when your kitchen feels back to normal again. For most homeowners, that matters just as much as the final colour.
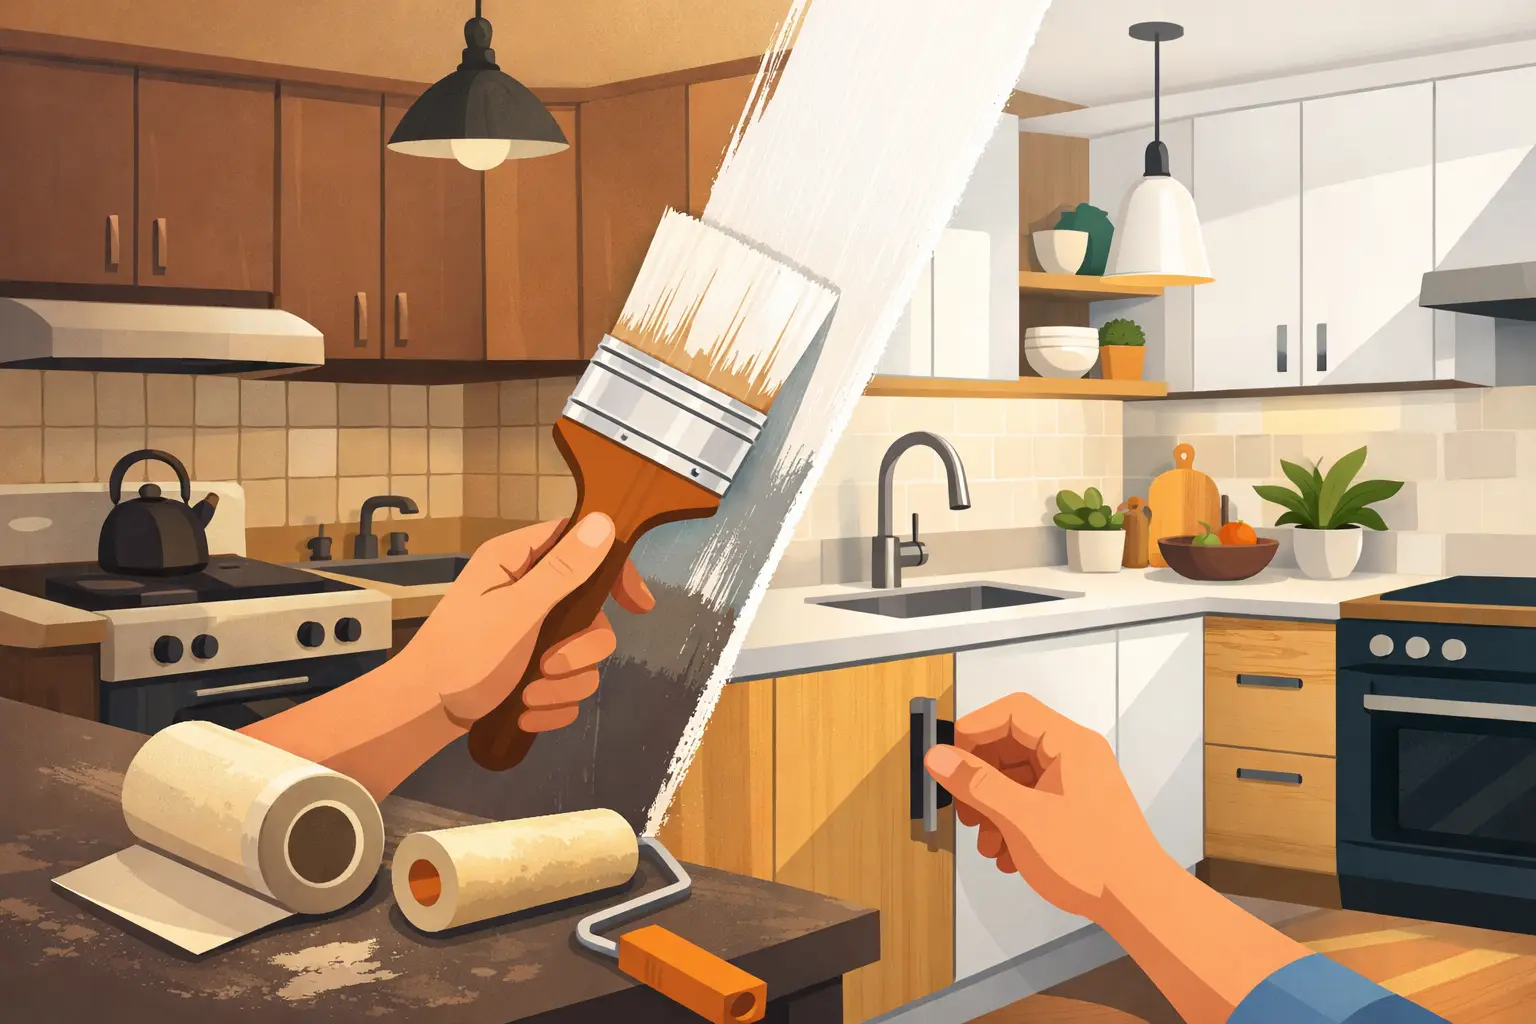
A professional kitchen respray is popular for a reason. It gives tired cabinets a stunning new look without the upheaval, waste and cost of ripping everything out. But like any specialist finish, good results depend on careful preparation and proper curing time. A rushed job may look fine for a few weeks, then start to chip around handles, edges and high-use doors.
Kitchen respray timeline from start to finish: what to expect
In most cases, the full process runs over several stages rather than one single burst of work. The on-site spraying itself may be relatively quick, but the overall timeline includes assessment, preparation, removal of doors, cleaning, sanding, priming, spraying, drying, refitting and aftercare. For a standard domestic kitchen, many projects are completed over a few days, though the exact timing depends on size, condition and complexity.
A smaller kitchen with flat doors in good condition will move faster than a large family kitchen with detailed profiles, worn surfaces or previous coating issues. If you are also having wardrobes or worktops refreshed at the same time, the schedule naturally extends. That is why any trustworthy provider should talk you through the likely sequence before work begins.
Before work starts: survey, colours and planning
The first stage is the home survey or consultation. This is where measurements are taken, the condition of the cabinetry is checked, and practical points are discussed, such as access, ventilation, colour choice and finish. It is also when any repairs or extra preparation needs become clear.
This early stage often takes less time than people expect, but it plays a large part in the final result. A kitchen with grease build-up near the hob, minor swelling around the sink unit, or old damage near hinges may need extra attention before any paint is applied. A professional team will be honest about that rather than painting over problems.
Once colours and finish are agreed, the job can be scheduled. Lead times vary depending on demand, but the actual respray timeline only starts once the work is booked in. If you are trying to coordinate with new flooring, tiling or worktop upgrades, it is worth planning these in the right order. Respraying usually works best once dusty building work is finished.
Day 1: protection, removal and preparation
The first working day is usually focused on protecting the area and preparing the kitchen properly. Doors and drawer fronts are often removed so they can be sprayed under controlled conditions, while fixed elements are masked carefully on site. Handles, hinges and fittings may also be taken off depending on the specification.
This is the stage many homeowners underestimate. Preparation is not glamorous, but it is where durable, professional finishes begin. Surfaces need to be thoroughly cleaned to remove grease, polish residues and day-to-day kitchen contaminants. After that comes sanding or keying the existing finish so the new coating bonds correctly.
If any minor repairs are needed, they are usually dealt with here. Small chips, dents or worn edges can often be improved before primer is applied. Larger structural problems are a different matter, and a reliable company will explain where respraying is the right solution and where replacement may make more sense.
Day 2: priming and the first coats
Once the surfaces are fully prepared, primer is applied where needed. This is not just a box-ticking exercise. The right primer helps adhesion, blocks stains and creates an even base for the topcoat. Different cabinet materials may need slightly different systems, which is why specialist knowledge matters.
After priming, the first colour coats are applied. Depending on the setup, doors may be sprayed off site or in a controlled workshop environment, while frames and fixed parts are completed on site with extensive masking in place. This controlled application is what gives resprayed kitchens their smooth, factory-style finish.
At this point, the kitchen is usually still out of full action. You may be able to use parts of the room, but it will not be business as usual. A good team will keep disruption to a minimum, though some inconvenience is unavoidable for a short period.
The middle of the job: drying, extra coats and quality checks
Drying time and curing time are not the same thing, and this is where expectations need to be realistic. A surface may feel touch-dry relatively quickly, but that does not mean it is ready for heavy use. Professional respraying systems are designed for durability, but they still need the correct intervals between coats and after application.
Additional coats are then applied to build colour depth and finish consistency. Dark shades, dramatic colour changes and certain surfaces may need more work than a straightforward refresh from one light neutral to another. The goal is not simply to cover the old kitchen, but to create an even, hard-wearing finish that looks refined from every angle.
Quality checks happen throughout, not just at the end. Edges, grooves, corners and high-visibility areas are inspected carefully. This is one of the clear differences between expert spraying and a quick cosmetic paint job. Kitchens are high-use spaces, and every weak spot tends to show itself quickly.
Day 3 or 4: reassembly and finishing touches
Once the sprayed components are ready to be handled safely, doors and drawer fronts are refitted. Handles and hardware are reinstalled, alignment is checked, and the overall finish is reviewed. This part can take longer than people expect, particularly in larger kitchens where getting every line neat and every door sitting correctly matters to the final appearance.
At this stage, your kitchen starts to look complete again. The visual transformation is often dramatic, especially where dated oak, pine or dark gloss units have been updated into a more contemporary finish. For many households, this is the point where the value of respraying becomes very clear – the room feels renewed without the mess and cost of a full strip-out.
What can affect the kitchen respray timeline from start to finish?
The biggest factor is size. A compact galley kitchen with a limited number of doors is naturally quicker than a large open-plan kitchen with an island, utility area and extra cabinetry. Condition also matters. If cabinets are in solid shape and simply look tired, respraying is usually straightforward. If surfaces are damaged, greasy or previously painted badly, more prep is needed.
Door style can also influence timing. Shaker and more detailed profiles take longer to prepare and spray than very plain slab fronts. Colour choice matters too. Strong whites, deep navy, charcoal and heritage tones can all look fantastic, but some shades and finish changes need more coats or tighter control.
Then there is access and environment. A kitchen in a busy family home with limited space, pets, or overlapping renovation work may require more careful scheduling. That does not mean the project becomes difficult, only that the plan should reflect real household conditions.
When can you use the kitchen normally again?
Most homeowners can return to light use fairly quickly, but full normal use should wait until the coating has had time to cure properly. That means being gentle with cupboard doors, avoiding harsh cleaning products, and not knocking surfaces with pans, chairs or heavy items in the early days.
Your respray specialist should give clear aftercare advice. In general, gentle treatment at the start helps protect the finish long term. This is not because the job is fragile, but because all high-quality coatings need time to reach their full hardness.
For busy households in Dublin, Wicklow, Kildare, Meath or Louth, that short period of care is usually a very reasonable trade-off when compared with weeks of disruption from a full kitchen replacement. It is one of the reasons so many homeowners choose respraying as the practical middle ground between living with an outdated kitchen and committing to a major renovation.
A realistic timeframe beats a rushed promise
A professional respray should feel efficient, but never hurried. If a company suggests they can prep, spray, dry, reassemble and fully finish a worn kitchen in unrealistically little time, it is fair to ask how they are protecting the quality of the result. Speed is useful, but durability matters more.
At Dublin Kitchen Respray, the focus is always on delivering an affordable, eco-friendly transformation with expert preparation and a finish that stands up to real daily use. That means being transparent about timings, careful about process, and respectful of the fact that this is your home, not just another job.
If you are planning a kitchen refresh, the best timeline is one that leaves you with confidence as well as a beautiful result. A few well-managed days can change the whole room, and if the work is done properly, you should be enjoying that new look for years rather than wondering why corners started to fail after a few months.